Upsilon Mazes
This article is adapted from material that I had originally written for my book, Mazes for Programmers @amazon | @b&n. It was intended to be the last section in chapter 8, “Exploring Other Grids”, following a discussion of hex and triangle grids. In order to trim the length of the book, though, I had to cut this section, which means I get to publish it on my blog instead!
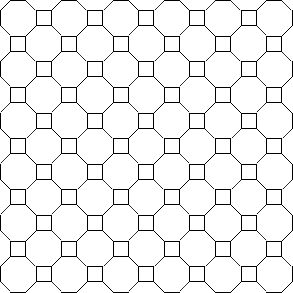
Let’s talk about grids formed by combining octogons and squares in what is called a truncated square tiling (also called a truncated quadrille). This kind of tiling gives you a nifty kaleidoscope effect:

Mazes made on this style of grid are called upsilon mazes for some reason, but at least it’s easier to say than octagon-and-square mazes. We’ll stick with “upsilon”, and name the grid that as well: upsilon mazes, and upsilon grids.
Upsilon grids have very well-defined horizontal and vertical rows and columns, unlike hexagon and triangle grids. But where most other grids have a single shape for every cell, upsilon grids need to represent both squares and octogons. This complicates things a little bit, but honestly, it’s not that bad.
Let’s implement one of these grids together, so you can see what I mean. We’ll start at the bottom, implementing the cells. (For those of you with my book, feel free to implement this using the framework I introduced there. For this blog post, though, I’m going to assume people are doing the work from scratch.)
Implementing the Cells
As mentioned, upsilon grids are composed of two different shapes: octagons and squares. We’ll create a base Cell class (which provides just basic functionality, like forging links between two adjacent cells), and then we’ll subclass that for our OctagonCell and SquareCell concrete subclasses.
The abstract Cell class looks like this:
class Cell
  attr_reader :row, :col

  def initialize(row, col)
    @row, @col = row, col
    @links = {}
  end

  def link(cell, both=true)
    @links[cell] = true
    cell.link(self, false) if both
    self
  end

  def links
    @links.keys
  end

  def linked?(cell)
    @links.key?(cell)
  end

  def neighbors
    raise NotImplementedError
  end

  def octagon?
    false
  end
end
The subclasses, then, just implement accessors for querying each of a cell’s neighbors, as well as a method that returns all of the cell’s neighbors at once:
class SquareCell < Cell
  attr_accessor :north, :south
  attr_accessor :east, :west

  def neighbors
    [north, south, east, west].compact
  end
end

class OctagonCell < Cell
  attr_accessor :north, :northwest, :northeast
  attr_accessor :east, :west
  attr_accessor :south, :southwest, :southeast

  def neighbors
    [north, northwest, northeast,
     east, west,
     south, southwest, southeast].compact
  end

  def octagon?
    true
  end
end
So far, so good! Let’s see how these play together in a grid, next.
Configuring the Grid
Our UpsilonGrid class will have this basic structure (we’ll flesh out the methods as we go):
require 'chunky_png' # for drawing the grid

class UpsilonGrid
  attr_reader :rows, :cols

  def initialize(rows, cols)
    @rows, @cols = rows, cols
    _setup_grid
    _configure_cells
  end

  # Return the cell at the given location, or nil if the
  # location is invalid.
  def [](row, col)
    return nil if row < 0 || row >= rows
    return nil if col < 0 || col >= cols
    @grid[row][col]
  end

  # Return a random cell from the grid.
  def sample
    @grid.sample.sample
  end

  # Iterate over all the cells in the grid.
  def each_cell
    @grid.each do |row|
      row.each do |cell|
        yield cell
      end
    end
    self
  end

  def _setup_grid
    @grid = Array.new(rows) do |row|
      # ...
    end
  end

  def _configure_cells
    each_cell do |cell|
      # ...
    end
  end

  def to_png
    # ...
  end
end
Looking at the initialize method, you’ll see we’re calling #_setup_grid to create the grid itself, and we’ll use #_configure_cells to describe which cells are adjacent to each other.
Let’s take these one a time.
If you look long enough at an illustration of an upsilon grid, you can see that the octagons and squares alternate.
One row will start with an octagon, and the next with a square. (It’s actually the same alternating pattern exhibited by the orientation of the cells on a triangle grid, from page 122 of my book.) There’s a simple rule we can follow to determine the shape for each cell: OctagonCell when the row and column sum to an even number, and SquareCell otherwise.
We can use that rule in #_setup_grid to populate our cell collection, like this:
def _setup_grid
  @grid = Array.new(rows) do |row|
    Array.new(cols) do |col|
      if (row + col).even?
        OctagonCell.new(row, col)
      else
        SquareCell.new(row, col)
      end
    end
  end
end
Just so! Our @grid variable is now a two-dimensional array of alternating octagons and squares. Next, we just need to iterate over each of those cells and tell them who their neighbors are. It’s not hard at all (just a little verbose):
def _configure_cells
  each_cell do |cell|
    row, col = cell.row, cell.col

    cell.north = self[row-1, col]
    cell.south = self[row+1, col]
    cell.west  = self[row, col-1]
    cell.east  = self[row, col+1]

    if cell.octagon?
      cell.northwest = self[row-1, col-1]
      cell.northeast = self[row-1, col+1]
      cell.southwest = self[row+1, col-1]
      cell.southeast = self[row+1, col+1]
    end
  end
end
Nothing to it, but brace yourself. This is just the calm before the storm. Next we’re going to dig into what it takes to actually display this thing.
Measuring the Grid
First, we’ll walk through the measurements needed to specify an octagon by its center point, and then show an implementation of #to_png that will draw the grid onto a canvas for us.
The key to deriving the points of the octagon relative to its center point is simply to split the octagon into triangles. Give it a try, if you’re so inclined, but note that because regular octagons don’t decompose to equilateral triangles, the math isn’t as neat as it is for, say, hexagons.
For brevity sake, here’s how it all breaks down on an octagon.
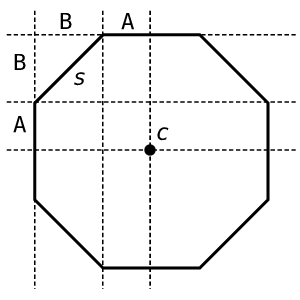
Let’s have each side of the octagon be of length s, and let c be the center point of the octagon. It’s clear from this that the lines drawn through c split those corresponding sides in half, so A must be s/2. And if we were to go through that little derivation I glossed over, we’d see that B must be equal to s/√2.
That’s all we need to know, then, to compute the x- and y-coordinates of each of the octagon’s vertices! If we take far to mean “furthest from the center”, and near to mean “nearest to the center”, then we can compute those coordinates like this:
a_size       = size / 2.0
b_size       = size / Math.sqrt(2)

x_west_far   = cx - a_size - b_size
x_west_near  = cx - a_size
x_east_near  = cx + a_size
x_east_far   = cx + a_size + b_size

y_north_far  = cy - a_size - b_size
y_north_near = cy - a_size
y_south_near = cy + a_size
y_south_far  = cy + a_size + b_size
Using those coordinates, then, we can specify the location of each of the octagon’s vertices. For instance, the vertex near the 10 o’clock position on the perimeter would be at (x_west_far, y_north_near).
All that’s left, then, is to be able to calculate the size of our canvas. (The #to_png method has to allocate a canvas to draw on, so we’ll need to be able to derive it’s dimensions.) It’s not too hard; it just requires that we slice up the grid a particular way. Consider this:
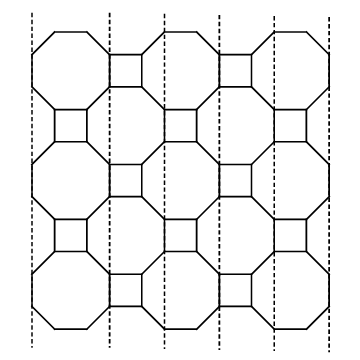
Given a 5x5 upsilon grid (three octagons and two squares in each dimension), we count one whole octagon width first, followed by one B-sized slice and a square-sized slice (size s) for each column. The height works out similarly. Our canvas dimensions, then, can be computed as follows:
oct_size = size + 2 * b_size

width  = oct_size + (columns - 1) * (b_size + size)
height = oct_size + (rows - 1) * (b_size + size)
Whew! Alright, let’s implement this.
Displaying the Grid
We have enough now to take a stab at the #to_png implementation. We’re actually going to be adding two new methods in addition to the #to_png method: one for drawing the octagons and one for drawing the squares.
First, though, here’s the #to_png method. It just computes the constants we derived above, and allocates the canvas. Then it iterates over each cell and calls the appropriate drawing method.
def to_png(size: 10)
  a_size = size / 2.0
  b_size = size / Math.sqrt(2)
  oct_size = size + b_size * 2

  img_width = (oct_size + (size + b_size) * (cols - 1)).to_i
  img_height = (oct_size + (size + b_size) * (rows - 1)).to_i

  background = ChunkyPNG::Color::WHITE
  wall = ChunkyPNG::Color::BLACK

  img = ChunkyPNG::Image.new(img_height+1, img_width+1,
    background)

  each_cell do |cell|
    # compute the center-point of the cell
    cx = b_size + a_size + (b_size + size) * cell.col
    cy = b_size + a_size + (b_size + size) * cell.row

    if cell.octagon?
      _draw_octagon_cell(img, wall, cell, cx, cy, a_size, b_size)
    else
      _draw_square_cell(img, wall, cell, cx, cy, a_size)
    end
  end

  img
end
The next method, #_draw_octagon_cell, is tasked with drawing the relevant walls of a single OctagonCell.
def _draw_octagon_cell(img, wall, cell, cx, cy, a_size, b_size)
  # First, compute the coordinates of each corner
  # f/n = far, near
  # n/s/e/w = north, south, east, west

  x_fw = (cx - a_size - b_size).to_i
  x_nw = (cx - a_size).to_i
  x_ne = (cx + a_size).to_i
  x_fe = (cx + a_size + b_size).to_i

  y_fn = (cy - a_size - b_size).to_i
  y_nn = (cy - a_size).to_i
  y_ns = (cy + a_size).to_i
  y_fs = (cy + a_size + b_size).to_i

  # The outermost north, northwest, west, and southwest walls
  # need # to be drawn specially, since there is no neighbor
  # in that direction that will draw them for us.
  img.line(x_nw, y_fn, x_ne, y_fn, wall) if !cell.north
  img.line(x_nw, y_fn, x_fw, y_nn, wall) if !cell.northwest
  img.line(x_fw, y_nn, x_fw, y_ns, wall) if !cell.west
  img.line(x_fw, y_ns, x_nw, y_fs, wall) if !cell.southwest

  # The northeast, east, southeast, and south walls only need
  # to be drawn if the cell is not linked to those neighbors
  # by a passage.
  img.line(x_ne, y_fn, x_fe, y_nn, wall) if !cell.linked?(cell.northeast)
  img.line(x_fe, y_nn, x_fe, y_ns, wall) if !cell.linked?(cell.east)
  img.line(x_fe, y_ns, x_ne, y_fs, wall) if !cell.linked?(cell.southeast)
  img.line(x_nw, y_fs, x_ne, y_fs, wall) if !cell.linked?(cell.south)
end
Lastly, we have the #_draw_square_cell. It’s much shorter than the
octagonal version, but works on the same principle: compute the
corners, and draw the walls.
def _draw_square_cell(img, wall, cell, cx, cy, a_size)
  # Compute the coordinates of the corners, from the
  # center point at (cx, cy)
  x1 = (cx - a_size).to_i
  y1 = (cy - a_size).to_i
  x2 = (cx + a_size).to_i
  y2 = (cy + a_size).to_i

  # Draw the walls
  img.line(x1, y1, x2, y1, wall) if !cell.north
  img.line(x1, y1, x1, y2, wall) if !cell.west
  img.line(x2, y1, x2, y2, wall) if !cell.linked?(cell.east)
  img.line(x1, y2, x2, y2, wall) if !cell.linked?(cell.south)
end
Now, let’s see if we did it right!
Making Upsilon Mazes
Let’s start by just drawing the grid itself. If we’ve coded everything up right, the following ought to do the trick:
grid = UpsilonGrid.new(11, 11)
grid.to_png.save("upsilon.png")
Odd-numbered dimensions tend to look better with upsilon grids, giving them a nice symmetry where each row and column starts and ends with the same shape, but feel free to experiment with different dimensions. Our 11x11 upsilon grid should look something like this:
Success!
Of course, we can’t stop there. We’re so close to having an actual upsilon maze! With a just a few more lines of code, we can apply the Recursive Backtracking algorithm, to build a maze on this thing. Try this:
grid = UpsilonGrid.new(11, 11)

stack = [ grid.sample ]
while stack.any?
  current = stack.last

  # find unvisited neighbors (they won't be linked
  # to any other cells)
  neighbors = current.neighbors.select { |n| n.links.empty? }

  neighbor = neighbors.sample

  if neighbor
    current.link(neighbor)
    stack.push(neighbor)
  else
    stack.pop
  end
end

grid.to_png.save("upsilon-maze.png")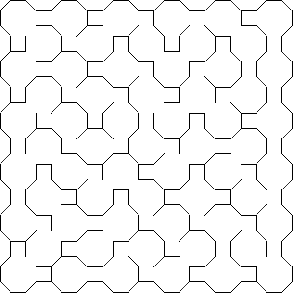
Looks good to me!
Try a few other maze algorithms with it and see what different effects you get. You may want to give it a try with Binary Tree and Sidewinder here, as well. The octagons and squares tile in a vaguely rectangular fashion, which means you can make both work simply by treating the octagons as squares and ignoring the diagonals. With a bit of thought, though, it’s even possible to use some of the diagonals with these algorithms.
Good luck!
P.S. If you want to play with the code I developed in this article, and you don’t want to go through the hassle of pasting it all together, I’ve put it all in a gist. Grab it here!
